Yarn inspirations... Inspiration tricot...
January 28, 2013


January 21, 2013
Knitted mittens idea!

You need:
- 3,5 mm straight needles
- 3,00 mm straight needles for the wrist bands
- stitch holder
Abbreviations:
pm-place marker
slm-slip marker
sl1 st–slip one stitch
RS-right side
WS-wrong side
Pattern:
CO 46 sts (52 for manly)
Make two. Both right and left gloves are worked the same
way.
Row 1: k1, (p1, k2) to the end of the row
Row 2(WS): (p2, k1) to the end of the row, purl last st
These two rows make the “Broken rib stitch” you will need
for bottom and top cuff of mitts. Repeat last two rows three times totally 8
rows broken rib stitch. (15 rows totally for manly).
Row 9 (RS): knit all sts
Row 10: purl all sts
Row 11: knit all sts
Row 12: purl all sts
St st 6 more rows (totally 10 rows of stockinette stitch).

 Row 19(RS):
k22, pm, k1, m1, k1, m1, pm, k22 (48 sts)
Row 19(RS):
k22, pm, k1, m1, k1, m1, pm, k22 (48 sts)

Shaping the
thumb:
 Row 19(RS):
k22, pm, k1, m1, k1, m1, pm, k22 (48 sts)
Row 19(RS):
k22, pm, k1, m1, k1, m1, pm, k22 (48 sts)
Row 20:
p22, slm, p4, slm, p22
Row 21:
k22, slm, k1, m1, k2, m1, k1, slm, k22 (50 sts)
Row 22:
p22, slm, p6, slm, p22
Repeat
increasing for the thumb this way till you get 18 sts (24 sts for manly)
between two markers, totally 62 sts on the needle.
Next row
(RS): k22, remove marker, place next 18 sts (24 sts for manly) on stitch
holder, remove marker, k22
Next row:
purl all sts (44 sts)
St st 10
rows more 8, totally 10 rows of stockinette stitch, finishing on right side
row.


Top cuff:
Row 1(WS): sl1 st, (p2, k1) to the end of the row, purl last
st
Row 2: sl1 st, (p1, K2) to the end of the row, k last st
“Broken rib stitch” again. Make four rows totally, bind off
at wrong side, cut a long end of yarn.

Thumb:
Place these 18 sts from the stitch marker to knitting
needle, right side toward you, reattach yarn and knit one row. Next 3 rows knit
as you finished the top cuff:
Row 1(WS): (p2, k1) to the end of the row, purl last st
Row 2: (p1, K2) to the end of the row
Row 3: (p2, k1) to the end of the row, purl last st
Row 4: (p1, K2) to the end of the row
Row 5 (WS): Bind off
Leave a long end of yarn.

Wrist bands:
Switch to 3.00 mm knitting needles.
Make two.
CO 10 sts
Row 1: knit
Row 2 (WS): sl1, k2, p1, k2, p1, k3
Row 3 (RS): sl1, k to end of the row
Buttonhole:
Row 4: sl1, k3, bind off 2 st, k3
Row 5: sl1, k2, p1, cast on 2 st on the left needle, k the 2
cast on sts, p1, k3
Row 6: knit all sts
Row 7 (WS): sl1, k2, p1, k2, p1, k3
Row 8 (RS): sl1, k to end of the row
Repeat last two rows till you measure about 4 inches. Bind
off, weave the ends.
This pattern is for personal use, knitting pleasure and fun.You are not permitted to sell whole or part of it.
This pattern is for personal use, knitting pleasure and fun.You are not permitted to sell whole or part of it.


January 15, 2013
Sparkle Recycled Vases
Hello! I would like to share with you these two vases, I made them from glass juice bottles. You need golden or silver glamour, glue and a lot of patience!


January 09, 2013
Cabled warm blanket & Pillow
All you need is a nice warm knitted blanket & good book in a cold night...
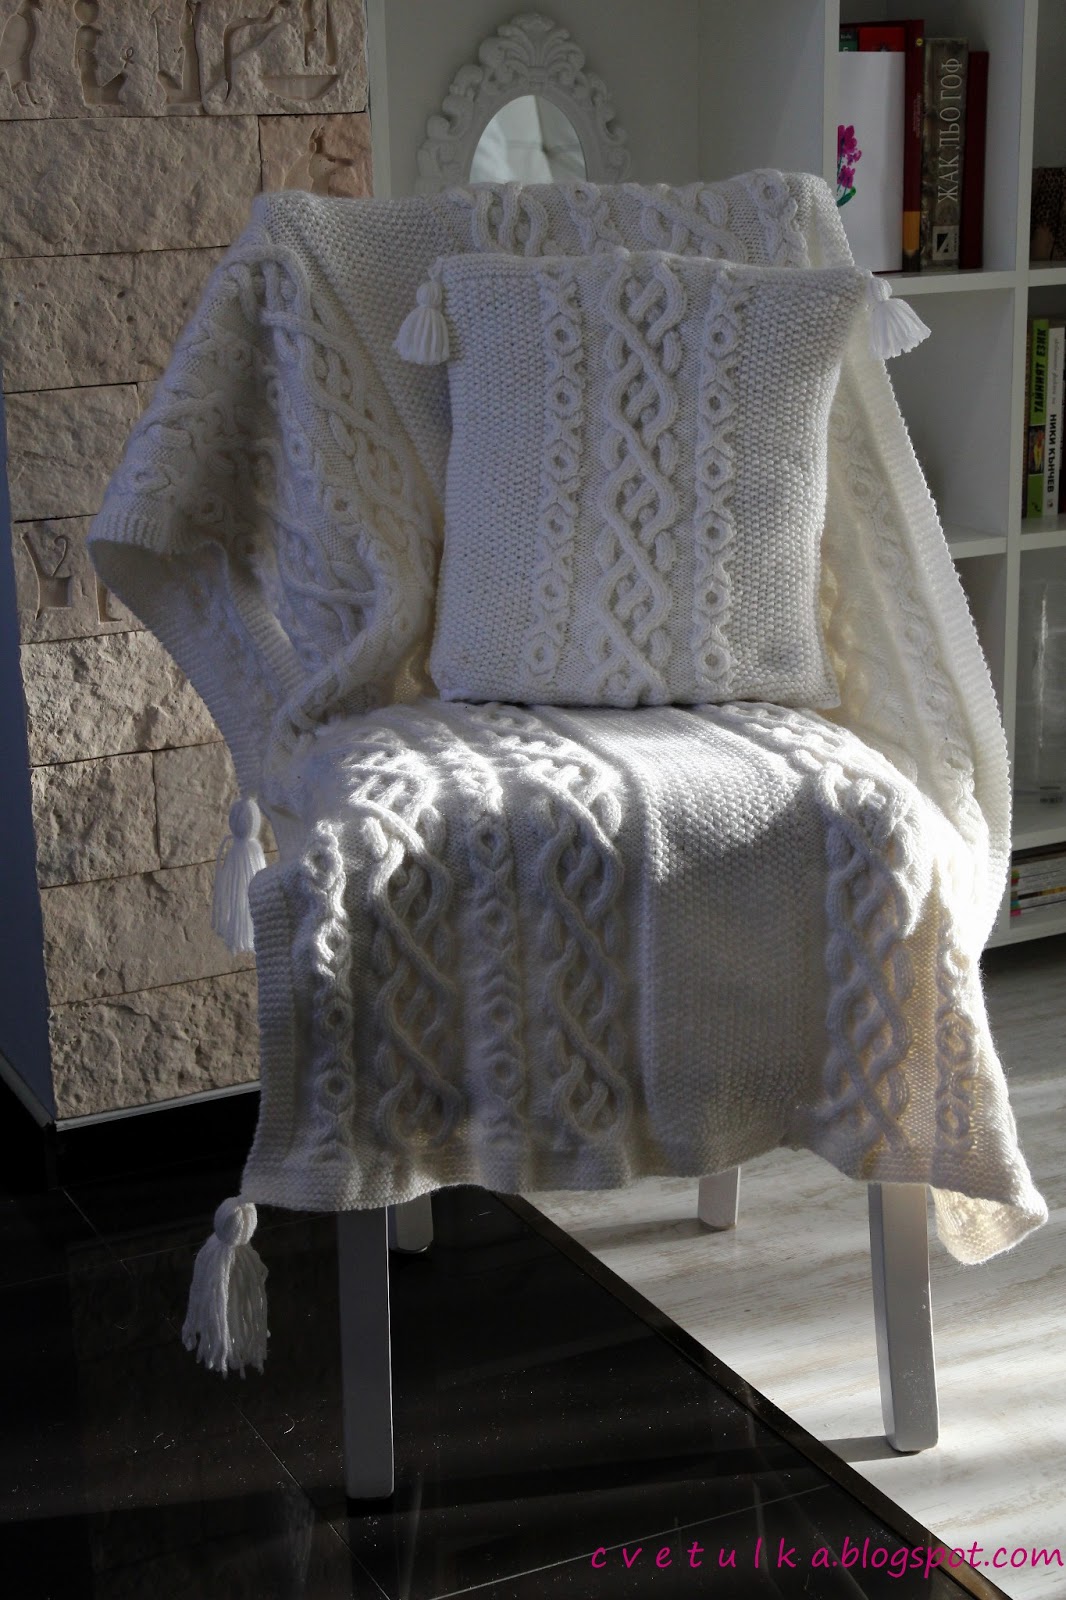

You need:
- straight needles 4 mm (US 6)
- cable needle (cn)
- I used yarn for 4 mm needles, 75% acrylic, 25% wool
- tapestry needle
Abbreviations:
CO-cast on
BO-bind off
k-knit
p-purl
cn-cable needle
Abbreviations:
CO-cast on
BO-bind off
k-knit
p-purl
cn-cable needle
Ensign’s Braid abbreviations:
CrL - sl 3 on cn at FRONT, p1, k3 from cn
CrR - sl 1 on cn at
BACK, k3, p1 from cn
C6F - sl 3 on cn at
FRONT, k3, k3 from cn
C6B - sl 3 on cn at
BACK, k3, k3 from cn
OXO Cable abbreviations:
C4F - sl 2 on cn at
FRONT, k2, k2 from cn
C4B - sl 2 on cn at
BACK, k2, k2 from cn
Pillow pattern:
CO 80 sts.
Rows 1-10: knit
Row 11: k5, (k1,
p1) seed stitch, OXO, p4, Braid, p4, OXO, (k1, p1) seed stitch, k5
(k5; then work in seed stitch 13 sts; then 8 sts in OXO cable; p4, 20 sts in Braid pattern; p4; 8 sts in OXO cable; 13 sts in seed stitch; knit 5 sts. Totally 80 sts.)
(k5; then work in seed stitch 13 sts; then 8 sts in OXO cable; p4, 20 sts in Braid pattern; p4; 8 sts in OXO cable; 13 sts in seed stitch; knit 5 sts. Totally 80 sts.)
Row 12: k5, seed
stitch, purl 8, p4, knit knits and purl purls, p4, p8, seed stitch, k5
Continue this way,
keep to the cable knitting patterns. Knit length as you need, finishing with 10
rows knit (the same way as the beginning). I sew a pillow-case from white satin for the back side.
Blanket pattern:
To make the blanket
I used the same cable knitting patterns-
Ensign’s Braid and Oxo cable. I knit blanket in two parts which i sew
together with mattress stitch. The width and length depends on your needs. Make
tassels at the ends.

Oxo Cable
Panel of 8 sts
Panel of 8 sts
Row 1: (RS) K8
Row 2: P8
 |
| Back side of the pillow |
Row 3: C4B, C4F
Row 4: P8
Row 5: K8
Row 6: P8
Row 7: C4B, C4F
Row 8: P8
Row 9: K8
Row 10: P8
Row 11: C4F, C4B
Row 12: P8
Row 13 K8
Row 14: P8
Row 15: C4F, C4B
Row 16: P8
Repeat these 16
rows.
 Ensign’s Braid
Panel of 20 sts
Row 1: (RS) k3, p4,
C6B, p4, k3
Row 2: k all k, p
all p sts
Row 3: (CrL, p2,
Cr4R) twice
Row 4: k all k, p
all p sts
Row 5: (p1, CrL,
Cr4R, p1) twice
Row 6: k all k, p
all p sts
Row 7: p2, C6F, p4,
C6B, p2
Row 8: k all k, p
all p sts
Row 9: (p1, CrR,
CrL, p1) twice
Row 10: k all k, p
all p sts
Row 11: (CrR, p2,
CrL) twice
Row 12: k all k, p
all p sts
Row 13: K3, p4,
C6F, p4, k3
Row 14: k all k, p
all p sts
Row 15: (CrL, p2,
CrR) twice
Row 16: k all k, p
all p sts
Row 17: (p1, Cr4L,
Cr4R, p1) twice
Row 18: k all k, p
all p sts
Row 19: p2, C6B,
p4, C6F, p2
Row 20: k all k, p
all p sts
Row 21: (p1, CrR,
CrL, p1) twice
Row 22: k all k, p
all p sts
Row 23: (CrR, p2,
CrL) twice
Row 24: k all k, p
all p sts
Repeat these 24
rows.
This pattern is for personal use, knitting pleasure and fun.You are not permitted to sell whole or part of it.
This pattern is for personal use, knitting pleasure and fun.You are not permitted to sell whole or part of it.
To be more comfortable I wrote these two tables below for you. They are printable. If you have any difficulty just email me!
P.S. Also, I place a stitch markers.


January 06, 2013
Doll clothes
Sewing clothes for a doll can be both fun and rewarding! I decided to make skirt and jeans using my old leg trousers. Natalia's baby doll has new winter warm clothing! Also I used a cabled stitch capelet & fingerless-mitts pattern for dolls by Debonair designs. The Beret is my idea. CLICK to see Naty and her doll!


 |
| Back side |


cabled stitch capelet, fingerless-mitts & beret


Subscribe to:
Posts (Atom)